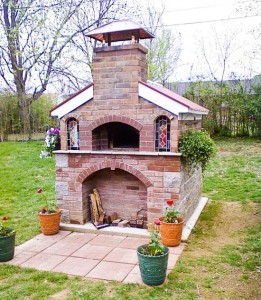
Oven with ornamental glass added to the brickwork
I was interested in building one of these ovens and I did build it! I decided to play with the extra decorations as it’s close to my heart.
Thanks for the CD with the original MTo instructions. I started in July 2011, and finished mine in about 4 months working part time (minus the winter months we get here in Missouri). I’ve attached a picture.
I was wondering what Materials I should use. I collected alot of red house bricks on the side of my house, they consist of various shades of reds to brown, and so I thought, is there any reason I cannot / should not build the outer walls with these bricks? I might not even need to paint these walls. Again, a big thank you my friend. Your CD is very helpful and full of all the information I needed, I am just a visual learner!
Craig
Farmington, MO
USA
Respond to the Oven with ornamental glass added to the brickwork article:
2 Comments
Sorry, the comment form is closed at this time.

Hi Craig,
Thank you for sending your oven photo. I can see you’ve done some interesting brick work, copper sheet chimney covering, and the two glass windows set in the front brick wall. Can you please share some words about these two decorative windows?! And how did you make them. Will be great to learn somethings about this art as well.
Chris made something similar in the front, however slightly lower and without the glass. In the two front corners there is that room and you utilized the space.
By Rado
I’d be glad to share. I grew up Catholic and the Sacred Heart Jesus and Virgin Mary statues came to me after my Grandma died and have been sitting around my house for 20 years. After using the concrete split faced blocks on the side, I knew my width would be a little wider and started to think about what I could do with the front besides just more brick. One of my memories of my grandparents’ home where these statues recessed in the walls with an arched glass frame as you went from the living room to the dining room and I thought why not incorporate them on my front. The widths of the enclosures were also adjustable allowing me to keep my brick measurements so I wouldn’t have to have small cuts and leaving them whole or halved on the back side of the oven. I had played around with cutting and soldering stained glass a few years ago, so I made the glass myself. It really isn’t hard to do. I do need to go back and cut some ventilation holes, because moisture keeps forming on the inside of the glass. I’ll do that next month when it gets a little warmer around here. Also, some type of solar accent light would be nice too. The back of the arched areas where covered with concrete board and I still had 6 inches to insulate them from the heat.
I found the copper flue cap design on the internet, but they wanted $350, so I made that myself too using some scrap copper. Not counting the scrap copper wire mesh that I had lying around, I spent just $20.
This was a fun and rewarding project, especially for someone who had never laid brick before. Actually, the only concrete that I had mixed or poured was for a wood deck post. In the beginning, I was so slow at laying the brick that my first row on the front took all day. I even cried to my wife saying I didn’t think I could do this. But as you see, things got better, and the pizza is delicious. Every time we fire the oven up, we always make an extra batch of dough, because someone shows up unexpected. Too cool!
I manage a catering business and my next project is a mobile oven. If you get time, can you give some input about incorporating your inner design into a mobile oven on a trailer? Will the firebrick hold together or will I need to use some type of castable concrete or the inner oven? Thanks again!
Sincerely,
Craig
By Craig