Adjusting internal oven width to 36″ – instead of 34″
Hi Rado,
I managed to pour the insulating slab without any problems. It looks great, I think. This whole project has been a great experience. Of course, I feel like I got the hang of mixing the Perlite and cement together at the end! I tried taking pictures of it so I’ll send those to you shortly.
I had a question about the dimensions I should use for the hearth slab. The dimension you sent me was 1200 mm wide, which is 47.25″. Would it be OK to make the oven a little wider? Instead of 34″ wide maybe 36″? The insulating slab is 62″ wide x 57.5″ long, so I think there’s lots of room for the width. What dimension would you suggest I pour the final slab at?
The white fire bricks I have are not straight, unfortunately. Two of them make a nice straight rectangle, 9″long x 4.5″x 5.5″ wide. So, for example when I place them on the final hearth slab they’ll be 4.5″ thick and two of them will make a rectangle 5.5″ wide x 9″ long. So, I’m estimating that adding an additional 5.5″ would give me about 10″ for insulating the cladded oven; 5″ on each side. I realized these dimensions might affect the arc dimensions & the door opening. What do you suggest I do?
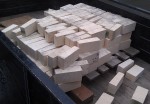

Just picked up the fire brick at a great price from someone on Craigslist. I bought more than I needed to cover any mistakes and expand the foot print if it’s worthwhile. What do you think? Is it worth making it any bigger? If so, how can I incorporate it into your new MTo oven design?
Check out the brick (picture attached). They’re slightly sloped on on side, but two if them make an equivalent rectangle of two standard fire bricks. Pretty cool! :)
Thanks again so much for your help!
—
I hope I’m not bothering you too much about the dimensions. I’ve been looking at the sequence (new 3G MTo) you sent me and I’ve come up with the following dimension for the slab. Basically just by adding and multiplying the bricks and clearances as far as I can tell.
Width of the slab for a 36″ wide interior, enlarged chamber width by 2 inches: 36″ + 2(4.5) (firebricks) + 2(2) (cladding) = 49″ which is basically 18 of my fire bricks, remember two of my bricks make a 5.5″ rectangle. Regarding the depth, I could also increase the depth by 1-2 inches if necessary. I read that the ovens are normally deeper than wide, so if it’s more appropriate to make it a little deeper since I’m trying to make it wider… what do you think?
I am confused though about one thing I thought I had understood (and even calculated once before) about the opening to vault height. In your 3G MTo pictures, you show that the vault height is a total of 16″ but your entrance is 11.5″. I thought it was 10″ which corresponds to your 63% opening you mention on your website.
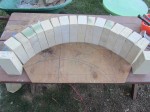
On this image the arch is put together from lengthwise tapered firebricks (pictures of the finished oven firebrick part, whole from these same tapered bricks, are at the end of this article. And the completed oven page.)
Again sorry for the frequent emails. I’m almost there! Once this slab is poured I’ll be working on the heart of the oven! Can’t wait!
Naeem, in Seattle, WA
—
Hi Naeem,
My apologies for the slight delay, I was on a remote jobs, but am back at home now. Just email me when you need, it’s all right so don’t hold back.
If you go to the original MTo design main folder, there is one sub-folder. In it is the low set MTo, built on the ground. The oven is used for business for 7-8 years now. That one has the entrance exactly 10″ high. But you can make it these 11-1/2″ high because it’s arched, meaning the extended 1-1/2 inch is only at the tip of the arch, whilst the both sides of the entrance are much lower then those 10″. The ovens with this entrance performs really well, no difference noticed in the performance, if something then only improvement. The 63% for 10″ entry and 16″ internal vault heights ratio refers only to the ovens with rectangular straight top line entrance 10 inches high. Higher pots and other items will fit in which makes the overall usage a bit more practical.
Yes the details of your firebricks show it on the IMAG1460.jpeg you emailed me. They are sort of skews, one flat side is angled. So 2 of them side by side create 5.5″ width instead of 2.5″ each. OK so, you plan to make interior 36″ wide:
These are thicknesses for
- 2″ – cladding layer
- 4.5″ – left wall
- 36″ – internal width
- 4.5″ – right side wall
- 2″ – cladding layer
If you increased cladding layer thickness to 3″ we just add additional 2 inches into the total slab width. I think you can go better with 3 inch cladding.
Math:
2″ + 4.5″ + 36″ + 4.5″ + 2″ = 49″ total top slab width
OR 51″ total slab width with 3 inches thick cladding on both sides.
NOW – adjusting it to your brick scenario below – 2 firebricks = 5.5″ wide.
(With 2″ thick cladding, 49″ total width it would make it 8.9 bricks. But 3″ is better so let’s say we ignore this.)
We will add 1 firebrick to the width. Assuming it’s those 3 inches wide.
Total slab width is 54 inches.
* Above the hip level, what are your outer walls going to be made from? Let me know we will quickly calculate also the total ground slab with – to make this more enjoyable!
Definitely it’s much easier to make the oven slightly deeper base than wider as to accommodate more room inside. This is mainly because wider oven needs wider arches, less span in the arch the less pressure too. Of course, the extra 1″ or 2″ in the total depth will be only prosperous.
Let me know.
Cheers,
Rado
—
Hi Rado,
Thanks so much for the quick response! I feel much better having written and thought about it with you (via email). I’ll hopefully cut the form today and make sure I have enough material to pour this Friday or Sat. Once the hearth slab is poured I’ll email you again to figure out the fire brick arch specs. Would that just be a radius of 18″ from the bottom of the fire brick….? I’ll start thinking about that after I pour the slab! :)
The walls will be made using the 1/2 concrete blocks; (4″X16″) which I also used to make the front of the ash slot. I’ll put together some of the photos to share with you ASAP. My excuse for being delayed is computer access at home. We have an Apple computer that I’m not as familiar with so packaging photos and sending them takes a little more time.
I was thinking Rado, you should publish a book! It would be the best sold oven book around the globe! Literally! I always enjoy the reading the stories and pictures on your website. Plus, it’d be mostly just amazing pictures of ovens that you helped people design!
Best,
Naeem
—
Hi Naeem,
You reckon I should write a book? It is a good idea, perhaps, if it also contained many related jokes ;-) to amuse readers, or with an accompanied stories here and there, so it’s sort of jazzy reading. Unconventional. And meal recipes obviously. Not just the boring building stuff. Then, maybe, the reading would be more enjoyable. I’ll stay on the ground, coz my English isn’t too appropriate … yet … for now.
18″ vault? Are you making walls, how high will the walls be? There will be the arch rise measure for the curve, height from the wall to the vault height – basically arch rise equals vault minus wall-height. Where the vault is height from the middle of the hearth/floor to ceiling.
The half wide/thick 4″x16″ concrete blocks for the second half are the best option. (The full size blocks are used in the first half below the hip level.) Ours here down under are basically ~ the same 90 mm = 3-1/2″ wide and 390 mm = 15-1/2 inches long. With the 36″ wide oven internally (compared to the original 34 inch width), adding one additional half length block into the total oven width will work everything out pretty well. They also sell 1/4 width blocks. A few of these quarter block sizes could be useful in the front once the extra 1/2 block is fitted into the width. The total ground slab will by wider by 8 inches. Or for us here down under by 19 Metric centimeters.
Everything is done on block or block count – not much measuring goes around when building these ovens. This can be written and worked out with a pencil on a piece of some wood very quickly, for visual explanation, and then all things cannot go wrong. But what’s described here below you’ve probably already have done. Also, you mentioned 5″ space for insulation in each side, that is really practical so keep it as you have it designed. I mentioned here only 3″ for the thermal insulation, which of course can be adjusted again very easily for more insulation in its volume.
|1″| 4″ | 3″ | 2″ | 4.5″ | 36″ inner width | 4.5″ | 2″ | 3″ | 4″ |1″|
1″ + 4″ + 3″ + 2″ + 4.5″ + 36″ + 4.5″ + 2″ + 3″ + 4″ + 1″ = 65″
65 inches total width for 36″ wide oven internally.
In profile view measurements for
- 1″ – all around the ground slab extends 1 inch further from the walls
- 4″ – concrete block wall
- 3″ – thermal insulation
- 2″ – cladding layer
- 4.5″ – left wall
- 36″ – internal width
- 4.5″ – right side wall
- 2″ – cladding layer
- 3″ – thermal insulation
- 4″ – concrete block wall
- 1″ – all around the ground slab extends further 1 inch from the walls
Kind regards,
Rado
—
Hi Rado,
Thanks for all the info and details. I think I’ve got the hearth slab figured out now. I’ll plan to pour today or tomorrow, I think. Do you think that and 18″ vault height is functionally OK? I don’t know how I’d make it any shorter given it’s built on a radius. If the vault is 18″ high, what dimensions should the entrance be? If I calculate a 63% opening it’s about 11.25″ high. How wide is the opening? Thinking how to make it the best way with my firebrick size, I could estimate it for my inside width but I thought I’d check in with you.
Regarding the book, I honestly think it’d be a best seller. You’ve been helping so many people and getting a book out there would be a huge help since people would be able to refer to the pictures and stories… and jokes. :) It does not have to be as technical (uselessly) as some of the others, but it would definitely be used as a reference for people to use. Plus, just think, all of who built an oven using your website would want one!
Best,
Naeem
—
Hi Naeem,
Email us photos of how you went until now, people will like to see the progress and what you currently have, it makes interesting information. All sounds fine.
I make the entrance 15.75″ wide (400mm), practically almost always I stick with that precise measure. it is easy to remember but also it makes me the nice arch. But the width is not crucial. If you find, that with your firebricks positioning into the arch, a width slightly different will suit more than go for it of course.
The intended arched 11.25″ entrance height with the 18″ vault is great. That setup will work well.
If your oven width 36″ and radius with firebricks number already make you a, accurate arch, the one way to lover the vault (and keeping the exact arch look) is by lowering the the height of the side walls on which the arch sits. If you feel like to play with it. How high are the side walls?
And we received progress photos one by one – Hearth and walls were made from all tapered firebricks.
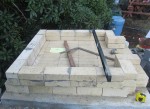
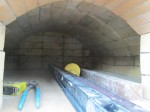
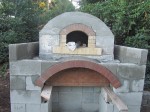
And we can see the page of the completed structure already, only a masonry moisture insulation is still to be applied as the back of this brick oven is set slightly in a hill.
Regarding the book suggestions –
You have implanted an idea into my head! I should start to produce some handy notes first and to build it, write the contents, from there.
Best regards,
Rado
Respond to the Adjusting internal oven width to 36″ – instead of 34″ article:
4 Comments
Sorry, the comment form is closed at this time.
Thanks Rado,
After reading more of your instructions I decided that although I like the igloo design the tunnel design may be more practical. The tighter joints will make a sturdier construction even though I think the heat circulation may be better in the igloo style. I plan to cook pizzas, meats, fish and breads in my oven.
I plan to be building the insulated base on a slab at ground level.
By Robert
Hi Robert,
Of course, by all means, I would place an insulating layer between the capping tiles and the dense hearth part which gets hot. Also, the hearth could have slightly more mass, this is usually achieved by putting floor bricks onto the top slab. Especially when the plans are to cook or bake
in the oven all you mentioned?
In actual fact, I never see any difference in the heat circulation inside, between rectangular or square oven hearth designs, with arch vault, versus the spherical floor dome shaped type ovens.
Similarly, some people say that certain firewood kinds give a different flavor to pizzas. Perhaps it’s only me, but I do not feel such difference, however, I certainly understand that various firewood perform differently and may burn and heat up very differently. It’s easy to get used to any kind. Some produce a more rapid burning while releasing the heat energy faster, other heavier and harder woods for instance will burn down gradually plus in the process these produce longer lasting embers. It is practical to have bigger mass for the heat absorption if you intend to bake breads and do varieties of cooking / roasting, meaning if not just pizzas are done. Are you positioning the oven low set, on a split level ground? It’s fine, it is all just a designing matter or what’s suits better to a place or a spot where the oven will be. The oven can function also as a main feature visually.
By Rado
Your website is very helpful thank-you for doing this. I am a little confused and hope you can answer a question. Are my numbers below correct for the interior of the oven?
If I am building a rectangular oven – the interior dimensions of the oven should be:
32 inches wide by 35 inches.
The door should be 10 inches high.
The inside height of the oven should be 16 inches high.
Are these numbers the same if I build a dome style oven?
Inside tallest point 16 inches high.
Bottom of the oven 32 inches wide and 36 inches long it would begin to slope inward at about 8 inches from the bottom.
Length of the oven 35 inches long, or deep.
Thanks for your help. Jim
By Jim
Hi Jim,
I build rectangular and square floor area ovens with arched vault/ceiling for inside hot-face made from firebricks. I always stick with the, by function most appropriate, 63% ratio between the entrance opening height and the internal oven height. Both are measured from the hearth surface. 10″ high entrance versus internally 16″ floor to ceiling height (at the highest point in the brick arch center.)
Other times, for the reason of being able to fit inside into the oven higher pots or roast items, racks, etc., I build the arched entrance 11-1/2″ high. Where the extra 1.5″ in the height adds only in the tip of the arch whilst both sides of this small arch are well below the 10″ mark. If the entrance into the oven was rectangular it stays 10 inches high. This 63 percent entry to inner height ratio math in brick oven designs, with flue vent for fumes exhaust in the front, functions the best. For cooking and baking, it won’t matter if the internal surface is somewhat adjusted by making a smaller room or bigger space inside.
By Rado